Yesterday I told the story of a time I demonstrated the raw, unrestrained power of paragraph styles in Microsoft Word. In case you don’t want to go back and read that, it amounted to a gasp and what was probably a sarcastic comment.
Even so, paragraph styles are quite cool.
Before you can see their powerful effects, though, you’ve got to have them all in place. And to do that, you really need to learn how to use them.
The good news is that it’s essentially the same thing we’ve been over with HTML styles in WordPress and Google Docs. The biggest difference is a slightly different menu (and a much friendlier editor).
Which Styles Work Best?
Now, as we’ve discussed for each of the last two weeks, it’s important to know that you can create totally custom paragraph styles in Word and get some cool effects. You could easily have a “novel body text” style, and a “novel chapter title,” and maybe “poem body” or “business letter salutation.”
I don’t recommend it. Just as I’ve been suggesting with the other programs, your best move is to stick with the standard styles, and customize them on a per-document-type basis.
How do you do that? In the advanced course, the answer is “with templates.” I’ve talked about those before, but Word will allow you to tell a document what template it should be using, and as soon as you change a document’s template from “Normal.dot” to “Novel-for-Submission.dot,” all of the paragraph styles’ formatting should update (without you manually changing the appearance of anything).
I don’t have enough time to teach you how to build and manage templates in this week’s lesson, though, so for now we’ll settle for customizing styles on a per-document basis. Next time you work on a new novel you’ll have to go through these same steps again, but they’re really not that involved.
Working with Styles
The first thing you’ve got to do, of course, is have some styles. Everything I’m about to describe would work perfectly with a novel you’d written from scratch, or one you’d already formatted manually that you wanted to change, but I’m going to save us a step and use one we’ve already got ready.
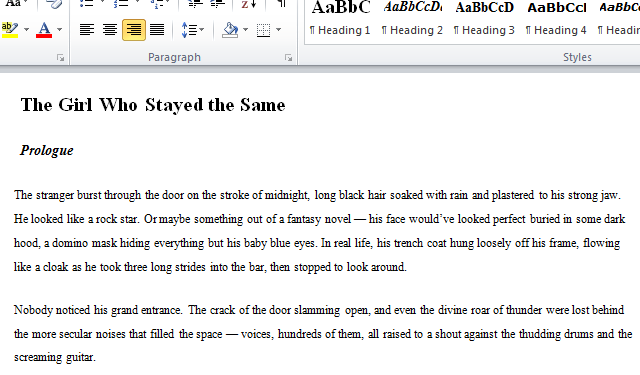
Remember that image from last week? It’s a novel that I wrote in Google Docs, using <p> for body text, <h3> for chapter titles, and <h1> for the novel title. If you’re working with an unstyled manuscript, your first step is to go through and get every paragraph styled.
And just like last week, that leaves us with a pretty ugly document, no matter what document type it is. I’ve never understood why the default style formatting had to be so unattractive.
Lucky for us, it’s also easy to fix. How depends on which version of Word you’re running, but if I remember right you either go to Format | Styles and Formatting (in Word 2003 and older), or from the Home ribbon click the little expansion arrow underneath the Styles portion.
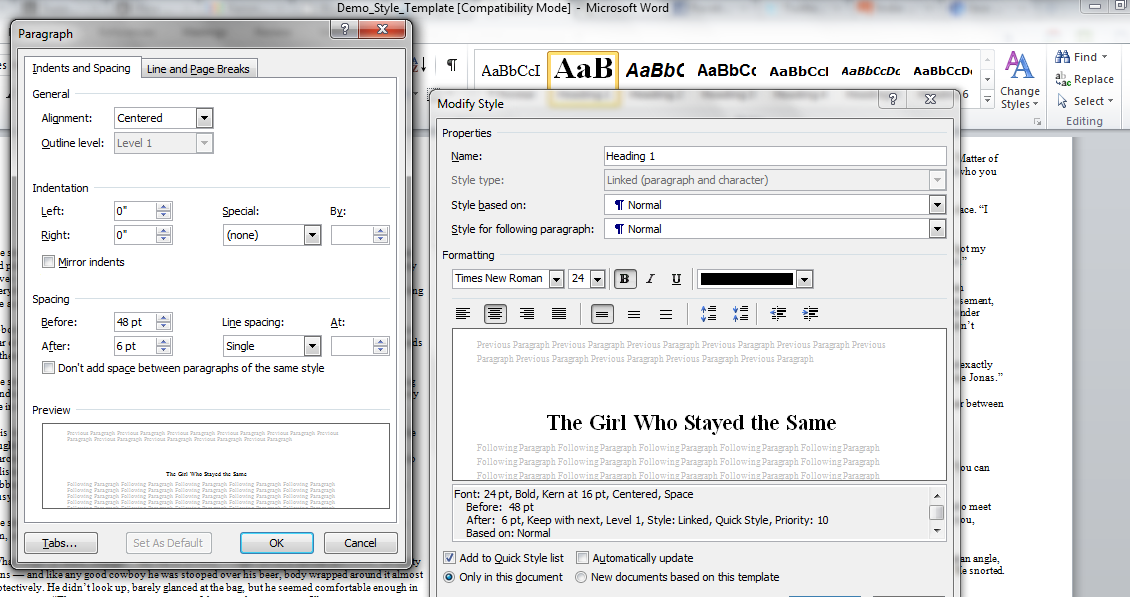
In either case, that’ll present you with a list of the default paragraph styles, and any custom styles embedded in the open Word document. Find the entry for Heading 1, right-click it, and from the context menu choose Modify.
On the Paragraph Style dialog, you can change the way every paragraph with this style shows up in your document. Per our editor’s instructions last week, let’s change Heading 1 to be Times New Roman, but bump it up to 24-point font and center it.
You can do all of that using the standard editing toolbar right there on the style’s main page, as you can see in the image above, but there are a lot more options available. Let’s look at a couple of them that I’ve found handy.
In the bottom left corner of the dialog, click the Format dropdown, and choose Paragraph. That opens the Paragraph Formatting dialog, where you can change things like first-line indents, hanging indents, left and right margins, and whitespace above and below the paragraph.
Those are the ones we really want to change here. Find that section near the bottom of the dialog, and change it to “48 pt” above, and “6 pt” below. Then click OK.
If your title text doesn’t automatically update to match your changes, click anywhere in that line, and then click on Heading 1 in the styles list. That should change it.
Now let’s make our chapter titles extra fancy. Find Heading 3, right-click and choose Modify, update the font settings, and then click the Format dropdown, and choose Paragraph again. This time, click over to the second tab, Line and Page Breaks, and check the box labeled Page break before.
Click OK on everything to get back to your document (and reapply the style to one of your chapter titles if necessary). Now your chapters will always start at the top of a new page. Fancy, huh?
You can also update Normal (Word’s version of <p>) to make sure your body text has 0.5″ first-line indent, there’s no space above or below, and that it’s all double-spaced (all of that is on the Paragraph Formatting dialog).
That’s a pretty significant visual change, and we didn’t alter a thing but the styles.
Putting Your Styles to Work
When that’s done, your document should be ready. Scroll through and make sure every paragraph has the proper style applied, then be sure to save it! You’d hate to lose all this work before you get to see the really fun stuff.
I’m saving the fun stuff, of course, for tomorrow. Come back, and I’ll show you how to generate smart text in Microsoft Word. You’ll be impressed.


